lundi 13 avril 2020

Hacktivity 2018 Badge - Quick Start Guide For Beginners

You either landed on this blog post because 
  • you are a huge fan of Hacktivity
  • you bought this badge around a year ago
  • you are just interested in hacker conference badge hacking. 
or maybe all of the above. Whatever the reasons, this guide should be helpful for those who never had any real-life experience with these little gadgets. 
But first things first, here is a list what you need for hacking the badge:
  • a computer with USB port and macOS, Linux or Windows. You can use other OS as well, but this guide covers these
  • USB mini cable to connect the badge to the computer
  • the Hacktivity badge from 2018
By default, this is how your badge looks like.


Let's get started

Luckily, you don't need any soldering skills for the first steps. Just connect the USB mini port to the bottom left connector on the badge, connect the other part of the USB cable to your computer, and within some seconds you will be able to see that the lights on your badge are blinking. So far so good. 

Now, depending on which OS you use, you should choose your destiny here.

Linux

The best source of information about a new device being connected is
# dmesg

The tail of the output should look like
[267300.206966] usb 2-2.2: new full-speed USB device number 14 using uhci_hcd
[267300.326484] usb 2-2.2: New USB device found, idVendor=0403, idProduct=6001
[267300.326486] usb 2-2.2: New USB device strings: Mfr=1, Product=2, SerialNumber=3
[267300.326487] usb 2-2.2: Product: FT232R USB UART
[267300.326488] usb 2-2.2: Manufacturer: FTDI
[267300.326489] usb 2-2.2: SerialNumber: AC01U4XN
[267300.558684] usbcore: registered new interface driver usbserial_generic
[267300.558692] usbserial: USB Serial support registered for generic
[267300.639673] usbcore: registered new interface driver ftdi_sio
[267300.639684] usbserial: USB Serial support registered for FTDI USB Serial Device
[267300.639713] ftdi_sio 2-2.2:1.0: FTDI USB Serial Device converter detected
[267300.639741] usb 2-2.2: Detected FT232RL
[267300.643235] usb 2-2.2: FTDI USB Serial Device converter now attached to ttyUSB0

Dmesg is pretty kind to us, as it even notifies us that the device is now attached to ttyUSB0. 

From now on, connecting to the device is exactly the same as it is in the macOS section, so please find the "Linux users, read it from here" section below. 

macOS

There are multiple commands you can type into Terminal to get an idea about what you are looking at. One command is:
# ioreg -p IOUSB -w0 -l

With this command, you should get output similar to this:

+-o FT232R USB UART@14100000  <class AppleUSBDevice, id 0x100005465, registered, matched, active, busy 0 (712 ms), retain 20>
    |   {
    |     "sessionID" = 71217335583342
    |     "iManufacturer" = 1
    |     "bNumConfigurations" = 1
    |     "idProduct" = 24577
    |     "bcdDevice" = 1536
    |     "Bus Power Available" = 250
    |     "USB Address" = 2
    |     "bMaxPacketSize0" = 8
    |     "iProduct" = 2
    |     "iSerialNumber" = 3
    |     "bDeviceClass" = 0
    |     "Built-In" = No
    |     "locationID" = 336592896
    |     "bDeviceSubClass" = 0
    |     "bcdUSB" = 512
    |     "USB Product Name" = "FT232R USB UART"
    |     "PortNum" = 1
    |     "non-removable" = "no"
    |     "IOCFPlugInTypes" = {"9dc7b780-9ec0-11d4-a54f-000a27052861"="IOUSBFamily.kext/Contents/PlugIns/IOUSBLib.bundle"}
    |     "bDeviceProtocol" = 0
    |     "IOUserClientClass" = "IOUSBDeviceUserClientV2"
    |     "IOPowerManagement" = {"DevicePowerState"=0,"CurrentPowerState"=3,"CapabilityFlags"=65536,"MaxPowerState"=4,"DriverPowerState"=3}
    |     "kUSBCurrentConfiguration" = 1
    |     "Device Speed" = 1
    |     "USB Vendor Name" = "FTDI"
    |     "idVendor" = 1027
    |     "IOGeneralInterest" = "IOCommand is not serializable"
    |     "USB Serial Number" = "AC01U4XN"
    |     "IOClassNameOverride" = "IOUSBDevice"
    |   } 
The most important information you get is the USB serial number - AC01U4XN in my case.
Another way to get this information is
# system_profiler SPUSBDataType

which will give back something similar to:
FT232R USB UART:

          Product ID: 0x6001
          Vendor ID: 0x0403  (Future Technology Devices International Limited)
          Version: 6.00
          Serial Number: AC01U4XN
          Speed: Up to 12 Mb/sec
          Manufacturer: FTDI
          Location ID: 0x14100000 / 2
          Current Available (mA): 500
          Current Required (mA): 90
          Extra Operating Current (mA): 0

The serial number you got is the same.

What you are trying to achieve here is to connect to the device, but in order to connect to it, you have to know where the device in the /dev folder is mapped to. A quick and dirty solution is to list all devices under /dev when the device is disconnected, once when it is connected, and diff the outputs. For example, the following should do the job:

ls -lha /dev/tty* > plugged.txt
ls -lha /dev/tty* > np.txt
vimdiff plugged.txt np.txt

The result should be obvious, /dev/tty.usbserial-AC01U4XN is the new device in case macOS. In the case of Linux, it was /dev/ttyUSB0.

Linux users, read it from here. macOS users, please continue reading

Now you can use either the built-in screen command or minicom to get data out from the badge. Usually, you need three information in order to communicate with a badge. Path on /dev (you already got that), speed in baud, and the async config parameters. Either you can guess the speed or you can Google that for the specific device. Standard baud rates include 110, 300, 600, 1200, 2400, 4800, 9600, 14400, 19200, 38400, 57600, 115200, 128000 and 256000 bits per second. I usually found 1200, 9600 and 115200 a common choice, but that is just me.
Regarding the async config parameters, the default is that 8 bits are used, there is no parity bit, and 1 stop bit is used. The short abbreviation for this is 8n1. In the next example, you will use the screen command. By default, it uses 8n1, but it is called cs8 to confuse the beginners.

If you type:
# screen /dev/tty.usbserial-AC01U4XN 9600
or
# screen /dev/ttyUSB0 9600
and wait for minutes and nothing happens, it is because the badge already tried to communicate via the USB port, but no-one was listening there. Disconnect the badge from the computer, connect again, and type the screen command above to connect. If you are quick enough you can see that the amber LED will stop blinking and your screen command is greeted with some interesting information. By quick enough I mean ˜90 seconds, as it takes the device 1.5 minutes to boot the OS and the CTF app.

Windows

When you connect the device to Windows, you will be greeted with a pop-up.

Just click on the popup and you will see the COM port number the device is connected to:


In this case, it is connected to COM3. So let's fire up our favorite putty.exe, select Serial, choose COM3, add speed 9600, and you are ready to go!


You might check the end of the macOS section in case you can't see anything. Timing is everything.

The CTF

Welcome to the Hacktivity 2018 badge challenge!

This challenge consists of several tasks with one or more levels of
difficulty. They are all connected in some way or another to HW RE
and there's no competition, the whole purpose is to learn things.

Note: we recommend turning on local echo in your terminal!
Also, feel free to ask for hints at the Hackcenter!

Choose your destiny below:

1. Visual HW debugging
2. Reverse engineering
3. RF hacking
4. Crypto protection

Enter the number of the challenge you're interested in and press [
Excellent, now you are ready to hack this! In case you are lost in controlling the screen command, go to https://linuxize.com/post/how-to-use-linux-screen/.

I will not spoil any fun in giving out the challenge solutions here. It is still your task to find solutions for these.

But here is a catch. You can get a root shell on the device. And it is pretty straightforward. Just carefully remove the Omega shield from the badge. Now you see two jumpers; by default, these are connected together as UART1. As seen below.


But what happens if you move these jumpers to UART0? Guess what, you can get a root shell! This is what I call privilege escalation on the HW level :) But first, let's connect the Omega shield back. Also, for added fun, this new interface speaks on 115200 baud, so you should change your screen parameters to 115200. Also, the new interface has a different ID under /dev, but I am sure you can figure this out from now on.


If you connect to the device during boot time, you can see a lot of exciting debug information about the device. And after it boots, you just get a root prompt. Woohoo! 
But what can you do with this root access? Well, for starters, how about running 
# strings hello | less

From now on, you are on your own to hack this badge. Happy hacking.
Big thanks to Attila Marosi-Bauer and Hackerspace Budapest for developing this badge and the contests.

PS: In case you want to use the radio functionality of the badge, see below how you should solder the parts to it. By default, you can process slow speed radio frequency signals on GPIO19. But for higher transfer speeds, you should wire the RF module DATA OUT pin with the RX1 free together.


Read more
  1. Pentest Tools Linux
  2. Hacking Tools And Software
  3. What Are Hacking Tools
  4. Pentest Tools Open Source
  5. Hack And Tools
  6. Hacker Tools For Mac
  7. Hack Tools For Ubuntu
  8. Wifi Hacker Tools For Windows
  9. Hack Tool Apk
  10. Hacker Tools Windows
  11. Underground Hacker Sites
  12. Pentest Tools Android
  13. Growth Hacker Tools
  14. Hacking Tools For Beginners
  15. Hackers Toolbox
  16. Hack Tools For Mac
  17. Hacking Tools Name
  18. Hacker
  19. Pentest Tools Apk
  20. Hacker Tools List
  21. Hack Tools For Windows
  22. Pentest Automation Tools

Defcon 2015 Coding Skillz 1 Writeup

Just connecting to the service, a 64bit cpu registers dump is received, and so does several binary code as you can see:


The registers represent an initial cpu state, and we have to reply with the registers result of the binary code execution. This must be automated becouse of the 10 seconds server socket timeout.

The exploit is quite simple, we have to set the cpu registers to this values, execute the code and get resulting registers.

In python we created two structures for the initial state and the ending state.

cpuRegs = {'rax':'','rbx':'','rcx':'','rdx':'','rsi':'','rdi':'','r8':'','r9':'','r10':'','r11':'','r12':'','r13':'','r14':'','r15':''}
finalRegs = {'rax':'','rbx':'','rcx':'','rdx':'','rsi':'','rdi':'','r8':'','r9':'','r10':'','r11':'','r12':'','r13':'','r14':'','r15':''}

We inject at the beginning several movs for setting the initial state:

for r in cpuRegs.keys():
    code.append('mov %s, %s' % (r, cpuRegs[r]))

The 64bit compilation of the movs and the binary code, but changing the last ret instruction by a sigtrap "int 3"
We compile with nasm in this way:

os.popen('nasm -f elf64 code.asm')
os.popen('ld -o code code.o ')

And use GDB to execute the code until the sigtrap, and then get the registers

fd = os.popen("gdb code -ex 'r' -ex 'i r' -ex 'quit'",'r')
for l in fd.readlines():
    for x in finalRegs.keys():
           ...

We just parse the registers and send the to the server in the same format, and got the key.


The code:

from libcookie import *
from asm import *
import os
import sys

host = 'catwestern_631d7907670909fc4df2defc13f2057c.quals.shallweplayaga.me'
port = 9999

cpuRegs = {'rax':'','rbx':'','rcx':'','rdx':'','rsi':'','rdi':'','r8':'','r9':'','r10':'','r11':'','r12':'','r13':'','r14':'','r15':''}
finalRegs = {'rax':'','rbx':'','rcx':'','rdx':'','rsi':'','rdi':'','r8':'','r9':'','r10':'','r11':'','r12':'','r13':'','r14':'','r15':''}
fregs = 15

s = Sock(TCP)
s.timeout = 999
s.connect(host,port)

data = s.readUntil('bytes:')


#data = s.read(sz)
#data = s.readAll()

sz = 0

for r in data.split('\n'):
    for rk in cpuRegs.keys():
        if r.startswith(rk):
            cpuRegs[rk] = r.split('=')[1]

    if 'bytes' in r:
        sz = int(r.split(' ')[3])


binary = data[-sz:]
code = []

print '[',binary,']'
print 'given size:',sz,'bin size:',len(binary)        
print cpuRegs


for r in cpuRegs.keys():
    code.append('mov %s, %s' % (r, cpuRegs[r]))


#print code

fd = open('code.asm','w')
fd.write('\n'.join(code)+'\n')
fd.close()
Capstone().dump('x86','64',binary,'code.asm')

print 'Compilando ...'
os.popen('nasm -f elf64 code.asm')
os.popen('ld -o code code.o ')

print 'Ejecutando ...'
fd = os.popen("gdb code -ex 'r' -ex 'i r' -ex 'quit'",'r')
for l in fd.readlines():
    for x in finalRegs.keys():
        if x in l:
            l = l.replace('\t',' ')
            try:
                i = 12
                spl = l.split(' ')
                if spl[i] == '':
                    i+=1
                print 'reg: ',x
                finalRegs[x] = l.split(' ')[i].split('\t')[0]
            except:
                print 'err: '+l
            fregs -= 1
            if fregs == 0:
                #print 'sending regs ...'
                #print finalRegs
                
                buff = []
                for k in finalRegs.keys():
                    buff.append('%s=%s' % (k,finalRegs[k]))


                print '\n'.join(buff)+'\n'

                print s.readAll()
                s.write('\n'.join(buff)+'\n\n\n')
                print 'waiting flag ....'
                print s.readAll()

                print '----- yeah? -----'
                s.close()


fd.close()
s.close()


More info


  1. Hacking Tools For Windows
  2. Pentest Tools Subdomain
  3. Hacking Tools Mac
  4. Hack Tools 2019
  5. Pentest Tools Website Vulnerability
  6. Hack Tool Apk No Root
  7. Pentest Tools Port Scanner
  8. Hack Tools Download
  9. Hacker Tools 2019
  10. Hacking App
  11. Blackhat Hacker Tools
  12. Pentest Tools Port Scanner
  13. Hack Tools For Pc
  14. Hack Apps
  15. Pentest Tools Nmap
  16. Pentest Tools Url Fuzzer
  17. Pentest Tools For Windows
  18. Hacker
  19. Blackhat Hacker Tools
  20. Pentest Tools For Windows
  21. Hacks And Tools
  22. Pentest Tools Subdomain
  23. Kik Hack Tools
  24. Hacking Tools Windows 10
  25. Hacker Tools Free Download
  26. Hack Tools For Mac
  27. Hack Tools For Pc

Hacking All The Cars - Part 1


A step by step lab based mini course on analyzing your car network


I wanted to learn about hacking cars. As usual I searched around the internet and didn't find any comprehensive resources on how to do this, just bits and pieces of the same info over and over which is frustrating. I am not a car hacking expert, I just like to hack stuff. This mini course will run in a fully simulated lab environment available from open garages, which means in 5 minutes from now you can follow along and hack cars without ever bricking your girlfriends car. Since you obviously wouldn't attack your own Lambo, totally use your girlfriends Prius. 

Below are the topics covered in this blog  series so you can decide if you want to read further: 

Whats covered in this car hacking mini course: 

Setting up Virtual Environments for testing
Sniffing CAN Traffic
Parsing CAN Traffic
Reverse Engineering CAN IDs 
Denial of service attacks
Replaying/Injecting Traffic
Coding your own CAN Socket Tools in python
Targeted attacks against your cars components
Transitioning this to attacking a real car with hardware

The first thing we are going to do before we get into any car hacking specifics such as "WTF is CAN?", is get your lab up and running. We are going to run a simple simulated CAN Bus network which controls various features of your simulated car. Its better to learn by doing then sit here and recite a bunch of car network lingo at you and hope you remember it.  

I also don't want you to buy a bunch of hardware and jack into your real car right away. Instead there are options that can get you started hacking cars RIGHT NOW by following along with this tutorial. This will also serve to take away the fear of hacking your actual car by understanding what your doing first. 


Video Playlist: 


Setting up your Lab: 

First things first, set yourself up with an Ubuntu VMware install, and load it up. Optionally you could use a Kali Iinux VM, however, that thing drives me nuts with copy paste issues and I think Kayak was giving me install problems. So support is on you if you would like to use Kali. However, I do know Kali will work fine with OpenGarages virtual car.. So feel free to use it for that if you have it handy and want to get started right away. 


Install PreReq Libraries: 

Once you load this up you are going to want to install CAN utilities and pre-requisite libraries. This is really easy to do with the following Apt-get commands:
sudo apt-get update
sudo apt-get install libsdl2-dev libsdl2-image-dev can-utils  

Then we are going to pull down the ICSimulator repo: 


Starting the simulator: 

Once this is done we can startup the simulator by changing directories to the downloaded repo and running the following 2 commands, which will setup a virtual CAN interface and a simulator GUI Cluster: 

Run the setup Script to get the vcan0 interface up: 
root@kali:~/ICSim# ./setup_vcan.sh 
root@kali:~/ICSim# ./icsim vcan0

On a new terminal tab we will open up our simulators controller with the following command,
root@kali:~/ICSim#./controls vcan0

Note: that the controller must be the in-focus GUI screen to send keyboard commands to the simulator. 


How to Use the Simulator: 

The simulator has a speedometer with Right and Left turn signals, doors etc.  Below are the list of commands to control the simulator when the Control panel is in focus. Give them each a try and note the changes to the simulator. 
Up and Down keys control the gauges clusters speedometer
Left and Right keys Control the Blinkers
Right Shift + X, A or B open doors 
Left Shift + X, A or be Close doors

Try a few of the above commands for example Right Shift +X and you will see the interface change like so, notice the open door graphic: 


Awesome, thanks to OpenGarages you now you have your very own car to hack

Notice in the setup commands above we used a VCan0 interface. Run Ifconfig and you will now see that you indeed have a new network interface that speaks to the CAN network over VCan0. 

ficti0n@ubuntu:~/Desktop/ICSim$ ifconfig vcan0
vcan0     Link encap:UNSPEC  HWaddr 00-00-00-00-00-00-00-00-00-00-00-00-00-00-00-00  
          UP RUNNING NOARP  MTU:16  Metric:1
          RX packets:558904 errors:0 dropped:0 overruns:0 frame:0
          TX packets:558904 errors:0 dropped:0 overruns:0 carrier:0
          collisions:0 txqueuelen:1 
          RX bytes:3663935 (3.6 MB)  TX bytes:3663935 (3.6 MB)


Car networks run on a variety of protocols most prevalent being CAN. You can think of a CAN Bus like an old school networking hub where everyone can see everyone elses traffic. This is true to some extent although you may not see all of the cars traffic if its not connected to that particular bus your plugged into. You can think of CAN traffic kind of like UDP in that its send and forget, the main difference being parts of the CAN bus network don't actually have addresses and everything runs off arbitration IDs and priorities. Thats enough background to get you doing rather then reading.

With a little knowledge out of the way lets check if we can see our CAN traffic from our virtual car via the CanDump utility, which you installed as part of CanUtils package above. Using the following command on the vcan0 interface our simulator uses you can view a stream of traffic: 

ficti0n@ubuntu:~/Desktop/ICSim$ candump vcan0


Above we can see a bunch of CAN frames, and if we perform actions on the vehicle we will see changes to data values in the CanDump output.  However this may happen very fast, and we may not be able to see if for example we unlocked our simulators door. This is because things are changing constantly in the cars IDLE state. One single value changing may not stand out enough for us to take notice or may scroll so fast we cant see it. 


Capture and Replay CAN Actions: 

One option would be to perform an action and replay it, we should see the actions happen again in the replay if the traffic for the action we recorded is on the same bus network our device is plugged into. There are loads of networks within a car and its not guaranteed our network tap for example an OBD2 port plugin is connected to the same network as door we opened.  Or the door may not be connected to the network at all depending on your car and its age or how its configured. 

Replaying dumps with CanPlayer: 
Another useful tool included with CanUtils package is CanPlayer for replaying traffic. If the functionality we are trying to capture is on the same Bus as the adaptor plugged into the car, or in this case our Virtual CAN interface, we can use CanDump to save traffic to a file. We then use CanPlayer to replay the traffic on the network. For example lets run CanDump and open a door and then replay the functionality with CanPlayer. 

Lab 1 Steps: 

  1. Run CanDump
  2. Right Shift + X to open a door
  3. Cancel CanDump (ctrl+c)
  4. Left Shift + X to close the door
  5. Run can player with the saved dump and it will replay the traffic and open the door

Recording the door opening:  (-l for logging) 
ficti0n@ubuntu:~/Desktop/ICSim$ candump -l vcan0

Replaying the CanDump file:  (use the file your can dump created) 
ficti0n@ubuntu:~/Desktop/ICSim$ canplayer -I candump-2018-04-06_154441.log 

Nice, so if all went well you should see that your door is now open again. If this did not happen when attacking a real car, just try to replay it again. CAN networks are not like TCP/IP, they are more like UDP in that you send out your request and its not expecting a response. So if it gets lost then it gets lost and you have to resend. Perhaps something with higher priority on the network was sending at the time of your replay and your traffic was overshadowed by it.   


Interacting with the Can Bus and Reversing Traffic: 

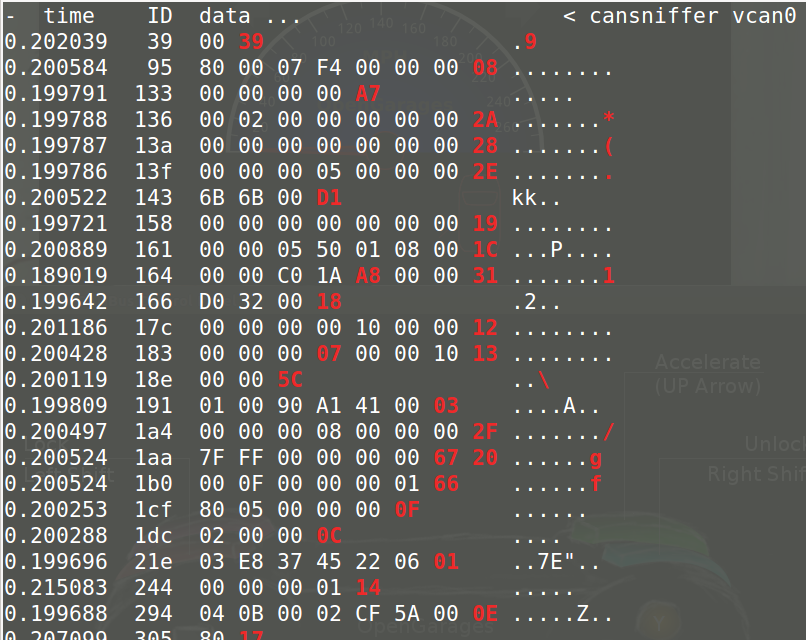
So thats cool, but what about actually understanding what is going on with this traffic, CanDump is not very useful for this, is scrolls by to quickly for us to learn much from.  Instead we can use CanSniffer with colorized output to show us the bytes within packets that change. Below is an example of CanSniffer Traffic: 

To startup can sniffer run the following: 
ficti0n@ubuntu:~/Desktop/ICSim$ cansniffer -c vcan0


You will see 3 fields, Time, ID  and Data. Its pretty easy to figure out what these are based on thier name. The most important part for our usage in this blog are the ID and the Data fields.  

The ID field is the frame ID which is loosely associated with the device on the network which is effected by the frame being sent. The ID to also determines the priority of the frame on the network.  The lower the number of the CAN-ID the higher priority it has on the network and more likely it will be handled first.  The data field is the data being sent to change some parameter like unlocking a door or updating output. You will notice that some of the bytes are highlighted RED. The values in red are the values that are changing during the idle state you are currently in. 


Determine which ID and Byte controls the throttle: 

So with the terminal sniffing window open put the simulator and the controller into the foreground, with the controller being the window you have clicked and selected.  Pay attention to the CanSniffer output while hitting the UP ARROW and look for a value that was white but is now Red and increasing in value as the throttle goes up.  This might take you a few minutes of paying attention to whats going on to see. 

The following 2 pictures show ID 244 in the IDLE state followed by pressing the up button to increase the speed. You will notice a byte has turned red and is increasing in value through a range of HEX values 0-F. It will continue to enumerate through values till it reaches its max speed. 


The byte in ID 244 which is changing is the value while the throttle is engaged, so 244 associated in some way with the increasing speed.   The throttle speed is a good value to start with as it keeps increasing its value when pressed making it easier to spot while viewing the CanSniffer output.  


Singling out Values with Filters: 

If you would like to single out the throttle value then click the terminal window and press -000000 followed by the Enter key which will clear out all of the values scrolling. Then press +244 followed by the Enter key which will add back the throttle ID. You can now click the controller again and increase the speed with your Up arrow button without all the noise clouding your view.  You will instead as shown below only have ID 244 in your output: 


To get back all of the IDs again click the terminal window and input +000000 followed by the Enter key.   Now you should see all of the output as before.  Essentially 000000 means include everything. But when you put a minus in front of it then it negates everything and clears your terminal window filtering out all values. 


Determine Blinker ID: 

Now lets figure out another ID for the blinkers. If you hit the left or right arrow with the controls window selected you will notice a whole new ID appears in the list, ID 188 shown in the picture below which is associated with the blinker. 


This ID was not listed before as it was not in use within the data output until you pressed the blinker control.  Lets single this value out by pressing -000000 followed by +188.  Just like in the throttle example your terminal should only show ID 188, initially it will show with 00 byte values. 

 As you press the left and the right blinker you will see the first Byte change from 00 to 01 or 02. If neither is pressed as in the screenshot above it will be 00. Its kind of hard to have the controller in focus and get a screenshot at the same time but the ID will remain visible as 00 until it times out and disappears from the list when not active. However with it filtered out as above you can get a better view of things and it wont disappear.  


Time for YOU to do some Protocol Reversing:

This lab will give you a good idea how to reverse all of the functionality of the car and associate each action with the proper ID and BYTE. This way you can create a map of intended functionality changes you wish to make.  Above we have done a few walk throughs with you on how to determine which byte and ID is associated with an action. Now its time to map everything out yourself with all the remaining functionality before moving on to attacking individual components.  


Lab Work Suggestion: 


  1. Take out a piece of paper and a pencil
  2. Try unlocking and locking doors and write down the ID which controls this action (remember your filters)
  3. Try unlocking each door and write down the BYTES needed for each door to open
  4. Try locking each doors and what Bytes change and what are their values, write them down
  5. Do the same thing for the blinkers left and right (Might be different then what I did above) 
  6. What ID is the speedometer using?  What byte changes the speed? 


Attacking Functionality Directly: 

With all of the functionality mapped out we can now try to target various devices in the network directly without interacting with the controllers GUI. Maybe we broke into the car via cellular OnStar connection  or the center console units BLE connection which was connected to the CAN network in some way.  
After an exploit we have direct access to the CAN network and we would like to perform actions. Or maybe you have installed a wireless device into an OBD2 port under the dashboard you have remote access to the automobile. 

Using the data from the CAN network reversing lab above we can call these actions directly with the proper CAN-ID and Byte.  Since we are remote to the target we can't just reach over and grab the steering wheel or hit the throttle we will instead send your CAN frame to make the change.
One way we can do this is via the CanSend utility. Lets take our information from our lab above and make the left turn signal flash with the following ID 188 for the turn signal by changing the first byte to 01 indicating the left signal is pressed. CanSend uses the format ID#Data. You will see this below when sending the turn signal via CanSend. 

ficti0n@ubuntu:~/Desktop/ICSim$ cansend vcan0 188#01000000 


You should have noticed that the left signal flashed. If not pay more attention and give it another try or make sure you used the correct ID and changed the correct byte.  So lets do the same thing with the throttle and try to set the speed to something with ID 244 that we determined was the throttle. 

ficti0n@ubuntu:~/Desktop/ICSim$ cansend vcan0 244#00000011F6 

My guess is that nothing happened because its so fast the needle is not going to jump to that value. So instead lets try repeating this over and over again with a bash loop which simply says that while True keep sending the throttle value of 11 which equates to about 30mph: 

ficti0n@ubuntu:~/Desktop/ICSim$ while true; do cansend vcan0 244#00000011F6;  done


Yes thats much better, you may notice the needle jumping back and forth a bit. The reason the needle is bouncing back and forth is because the normal CAN traffic is sent telling the car its actually set to 00 in between your frames saying its 30mph.  But it worked and you have now changed the speed the car sees and you have flashed the blinker without using the cars normal blinker controls. Pretty cool right? 


Monitor the CAN Bus and react to it: 

Another way to handle this issue is to monitor the CAN network and when it sees an ID sent it will automatically send the corresponding ID with a different value.. Lets give that a try to modify our speed output by monitoring for changes. Below we are simply running CanDump and parsing for ID 244 in the log output which is the throttle value that tells the car the speed. When a device in the car reports ID 244 and its value we will immediately resend our own value saying the speed is 30mph with the value 11.  See below command and try this out. 

ficti0n@ubuntu:~/Desktop/ICSim$ candump vcan0 | grep " 244 " | while read line; do cansend vcan0 244#00000011F6; done

With this running after a few seconds you will see the speed adjust to around 30MPH once it captures a legitimate CAN-ID 244 from the network traffic and sends its own value right after.  

Ok cool, so now while the above command is still running click the controller window and start holding down the Up arrow with the controller in focus.. After a few seconds or so when the speed gets above 30MPH you will see the needle fighting for the real higher value and adjusting back to 30MPH as your command keeps sending its on value as a replacement to the real speed. 

So thats one way of monitoring the network and reacting to what you see in a very crude manner.  Maybe someone stole your car and you want to monitor for an open door and if they try to open the door it immediately locks them in. 


Conclusion and whats next: 

I am not an expert car hacker but I hope you enjoyed this. Thats about as far as I want to go into this subject today, in the next blog we will get into how to code python to perform actions on the CAN network to manipulate things in a similar way.  With your own code you are not limited to the functionality of the tools you are provided and can do whatever you want. This is much more powerful then just using the CanUtils pre defined tools. Later on I will also get into the hardware side of things if you would like to try this on a real car where things are more complicated and things can go wrong. 

Related posts

Group Instant Messaging: Why Blaming Developers Is Not Fair But Enhancing The Protocols Would Be Appropriate

After presenting our work at Real World Crypto 2018 [1] and seeing the enormous press coverage, we want to get two things straight: 1. Most described weaknesses are only exploitable by the malicious server or by knowing a large secret number and thereby the protocols are still very secure (what we wrote in the paper but some newspapers did not adopt) and 2. we see ways to enhance the WhatsApp protocol without breaking its features.


We are of course very happy that our research reached so many people and even though IT security and cryptography are often hard to understand for outsiders, Andy Greenberg [2], Patrick Beuth [3] and other journalists [4,5,6,7,8] wrote articles that were understandable on the one hand and very accurate and precise on the other hand. In contrast to this, we also saw some inaccurate articles [9,10] that fanned fear and greatly diverged in their description from what we wrote in our paper. We expected this from the boulevard press in Germany and therefore asked them to stick to the facts when they were contacting us. But none of the worst two articles' [9,10] authors contacted us in advance. Since our aim was never to blame any application or protocol but rather we wanted to encourage the developers to enhance the protocols, it contradicts our aim that WhatsApp and Signal are partially declared attackable by "anyone" "easily" [9,10].

Against this background, we understand Moxie's vexation about certain headlines that were on the Internet in the last days [11]. However, we believe that the ones who understand the weaknesses, comprehend that only the malicious server can detectably make use of them (in WhatsApp) or the secret group ID needs to be obtained from a member (in Signal). As such, we want to make clear that our paper does not primarily focus on the description of weaknesses but presents a new approach for analyzing and evaluating the security of group instant messaging protocols. Further we propose measures to enhance the analyzed protocols. The description of the protocols' weaknesses is only one part of the evaluation of our analysis approach and thereby of the investigation of real world protocols. This is the scientific contribution of our paper. The practical contribution of the analyzed messengers, which is the communication confidentiality for billion users (in most cases), is great and should be noted. Therefore we believe that being Signal, WhatsApp, or Threema by applying encryption to all messages and consequently risking research with negative results is much better than being a messenger that does not encrypt group messages end-to-end at all. We do not want to blame messengers that are far less secure (read Moxie's post [11] if you are interested).

Finally we want note that applying security measures according to the ticket approach (as we call it in the paper [12]) to the invitation links would solve the issues that Facebook's security head mentioned in his reply [13] on our findings. To our knowledge, adding authenticity to group update messages would not affect invitation links: If no invitation link was generated for a group, group members should only accept joining users if they were added by an authentic group update message. As soon as a group invitation link was generated, all joining users would need to be accepted as new group members with the current design. However there are plenty ways how WhatsApp could use invitation links without endowing the server with the power to manage groups without the group admins' permission:
One approach would be generating the invitation links secretly and sharing them without the knowledge of the server. An invitation link could then contain a secret ticket for the group and the ID of the group. As soon as a user, who received the link, wants to join the group, she can request the server with the group ID to obtain all current group members. The secret ticket can now be sent to all existing group members encrypted such that the legitimate join can be verified.

Of course this would require engineering but the capability of WhatsApp, shipping drastic protocol updates, can be assumed since they applied end-to-end encryption in the first place.

[1] https://www.youtube.com/watch?v=i5i38WlHfds
[2] https://www.wired.com/story/whatsapp-security-flaws-encryption-group-chats/
[3] http://www.spiegel.de/netzwelt/apps/whatsapp-gruppenchats-schwachstelle-im-verschluesselungs-protokoll-a-1187338.html
[4] http://www.sueddeutsche.de/digital/it-sicherheit-wie-fremde-sich-in-whatsapp-gruppenchats-einladen-koennen-1.3821656
[5] https://techcrunch.com/2018/01/10/security-researchers-flag-invite-bug-in-whatsapp-group-chats/
[6] http://www.telegraph.co.uk/technology/2018/01/10/whatsapp-bug-raises-questions-group-message-privacy/
[7] http://www.handelsblatt.com/technik/it-internet/verschluesselung-umgangen-forscher-finden-sicherheitsluecke-bei-whatsapp/20836518.html
[8] https://www.heise.de/security/meldung/WhatsApp-und-Signal-Forscher-beschreiben-Schwaechen-verschluesselter-Gruppenchats-3942046.html
[9] https://www.theinquirer.net/inquirer/news/3024215/whatsapp-bug-lets-anyone-easily-infiltrate-private-group-chats
[10] http://www.dailymail.co.uk/sciencetech/article-5257713/WhatsApp-security-flaw-lets-spy-private-chats.html
[11] https://news.ycombinator.com/item?id=16117487
[12] https://eprint.iacr.org/2017/713.pdf
[13] https://twitter.com/alexstamos/status/951169036947107840

Further articles:
- Matthew Green's blog post: https://blog.cryptographyengineering.com/2018/01/10/attack-of-the-week-group-messaging-in-whatsapp-and-signal/
- Schneier on Security: https://www.schneier.com/blog/archives/2018/01/whatsapp_vulner.html
- Bild: http://www.bild.de/digital/smartphone-und-tablet/whatsapp/whatsapp-sicherheitsluecke-in-gruppenchats-54452080.bild.html
- Sun: https://www.thesun.co.uk/tech/5316110/new-whatsapp-bug-how-to-stay-safe/

More info


  1. Pentest Tools Free
  2. Hacking Tools Online
  3. Easy Hack Tools
  4. Hacker Tools Apk Download
  5. Hack Tool Apk No Root
  6. Hacking Tools 2019
  7. Hacker Search Tools
  8. Hacker Tools Linux
  9. Pentest Tools Website
  10. Black Hat Hacker Tools
  11. Hacking Tools Pc
  12. What Are Hacking Tools
  13. Pentest Tools Nmap
  14. Best Hacking Tools 2019
  15. Pentest Tools Online
  16. Hacking Tools Windows 10
  17. Hackrf Tools
  18. Hack Website Online Tool
  19. Hacker Tools Software
  20. Hack And Tools

samedi 11 avril 2020

Movie Review: Avengers: Endgame (SPOILERS)

Probably the best thing about Endgame is that it's the (almost) last of the first generation of MCU movies (we still have a Spiderman movie, maybe a Black Widow movie, and I'm sure a whole 'other next-generation of MCU movies are in the works). Is it a good movie? No. Is it a good-MCU movie? It's fine, much in the same way that Harry Potter 8 was fine: it does what it is supposed to.

That it broke box office records is understandable since the last movie was a cliff-hanger. Less understandable is its rave reviews, unless the reviews are based on its "must see" quality. Because, even from a Marvel perspective, the movie just barely makes sense, is disjointed, has too many scenes that are just sketches, has too many underused characters, and has an ending that is somewhat anti-climactic. What it has going for it is some emotional impact (a bit), some humor (not all of it good), some flashbacks to previous MCU movies, some nice visuals, and a sense of an ending.

PLOT: Following the last movie where half of the universe is wiped out, the characters are upset. The survivors track down Thanos who has already destroyed the stones so that his work can't be undone, so all they can do is kill him. Five years later Ant-Man is accidentally rescued from the quantum realm but has experienced only 5 hours, which leads him to think that the Avengers can use the quantum realm to go back in time - and space (???) - to very specific times and places in order to steal the infinity stones from the past, undo what Thanos did, and return them to their timelines. Unfortunately, while in the past, future Nebula's presence and memories alert past Thanos to this plan and he travels into the present to destroy the universe and remake a new one that won't try this plan again.

REACTIONS: Let's put a pin onto the obvious time-travel paradox problems, and even the rest of the insane problems for one minute and take the movie as is. This movie takes a little time to show us Hawkeye's family, Iron Man's daughter, and a few other character-relationship moments, which is a little more than we get in most MCU movies and which was nice. There was at least some attempt to deal with the failure and loss of the last movie, although, other than an argument from Iron Man and a sense of purpose from Captain America, these attempts were laughably badly done. Thor's gut belly and indifference was supposed to be funny, but other than the quick visual punch it really wasn't. On the one hand it was nice to see an overweight superhero. On the other, too many jokes were made about him being out of shape.

Now we have to take the pin out, because this movie's basic plot, premise, and how it deals with what happened is just insane:

  • If you wipe out half of all "living creatures", what about the animals and vegetation?
  • If you wipe our half of all living creatures, far FAR more than half of the remainder are going to die, and pretty soon. Half of all airplane pilots of mid-flight airplanes and half of the air-traffic controllers are gone. That's thousands of crashed flights. Half of all drivers of cars and trucks are gone but their cars are still speeding. That stops EVERY car and truck on the road, killing millions of people and instantly blocking every major and minor thoroughfare. Who's left to un-jam the roads? Half of all surgeons are gone mid-operation and nurses mid-care. Half of all single-parents with dependents that can't get help. Half of the people that care for remote villages.
  • How about every religion? How many of them could deal with half of their flock, including their pope or chief or most of their cardinals, dying? No riots? No looting? No new cults or major overthrows? How are the governments still working? How are buildings? How is food and medicine getting delivered, let alone produced and harvested and supplied?
  • How about financial markets and the collapse of industry? How about the collapse of all national security? How about rogue nations and terrorism? How about ...
  • Let's talk about what it would mean then to reintroduce half of the population again five years after the world has moved on without them. Where are they reintroduced into the world, including the ones that were mid-flight or mid-driving? Up in the air, at their destination, or at home? Who owns what? Who is married to whom? Who is producing food for them and where do they live?
  • The point is that this kind of disaster is a mcguffin, something that you can't think about even in the most shallow terms because it doesn't make any sense, but the MCU just throws it in and expects you not to think about it.
And that's not even considering the loony ways that time-travel is dealt with, screwing around with multiple timelines with no concept of how to resolve any of the changes. But that consideration is, at least, par for the course for bad sci-fi movies. Also, how does time travel = infinite space travel?

As far as characters go:
  • Iron Man is well acted and has a good show. It was nice to see his callback to the end of the first movie
  • Captain America has definitely grown as a character and had a good show.
  • Black Widow / Hawkeye: yes, it was a better choice for her to die, since he has a real family, but the movie doesn't make you feel that that was more than a plot consideration. Her death was more tragic than Iron Man's, but she is only given a few words of remorse while he is given a whole ending funeral and condolence scene. Which just goes to show that the MCU still doesn't consider the women to be as important as the men.
  • Captain Marvel has barely 15 minutes of screen-time after her big movie. It's entirely unclear how she rescues Iron Man at the beginning. The nice shot of all of the remaining women characters was nice, but it shouldn't be: there are tons of shots of all men characters that we simply take for granted, but the MCU makes us wait for a big, dramatic shot of women characters. I will be more excited when there are so many scenes and shots of women superheroes that we don't notice them anymore.  Which just goes to show that the MCU still doesn't consider the women to be as important as the men.
  • Thanos' powers are never explained. Why would the God of Thunder and several of his weapons have no effect on him, why is he able to break Captain America's unbreakable shield, and why can't even Captain Marvel put a dent in him? Plot, is the only reason. The MCU dug themselves into a hole when they gave superheroes so much strength and then could not think  of a way to create tension without simply ignoring all of that strength. Tension with an overly strong superhero is supposed to come from moral complexity, deception, and self-actualization, not from Something Even Stronger.
  • Hulk: They keep finding new ways to present him to keep him fresh, which is nice. But he's still pretty boring as a character.
  • Ant-Man: I kind of forgot where he was, once the time travelling started. Oh wait, I think I saw him flying around with the Wasp here and there. Whatever.
  • Nebula and Gemora had a lot to do, and they were the stars. Too bad they were pretty boring in their previous movies.
  • Pepper: Gwenyth stole the scenes she was in just by being a better actor and presence than anyone else.
  • Black Panther, Spider-man, Doctor Strange, etc all showed up just to be there, but served no other purpose.
As a movie qua movie, the movie exists only to complete what happened in the last movie. It contained no real moral dilemmas, no real character tension, no real insights, no real inspiration or sacrifice (Black Widow's sacrifice was antiseptic and Iron Man's was accidental), and nothing really interesting story-wise other than its utter mangling and refusal to deal with the more interesting ramifications of story that was supposedly occurring around them.

Was it entertaining? If you ignore all of the parts than made my brain hurt, then it was entertaining. I wanted to see how it ended, which is about all one could have hoped for and no more. Infinity War was more entertaining and more satisfying (not that it was good, per se, but it was a better MCU movie). This was just okay.

mercredi 8 avril 2020

Space Pirate Trainer VR Free Download

Remember those awesome classic arcade cabinets? Imagine if those were immersive… Space Pirate Trainer puts you in one of those; fighting off relentless waves of droids with all the weapons and gadgets you would ever need as a space pirate. You better dodge some of those incoming lasers though, since just using your shields won't get you in the top rankings. Pick up your blasters, put on your sneakers, and dance your way into the Space Pirate Trainer hall of fame.

Space Pirate Trainer is the official trainer for wannabe space pirates in VR. Launched as one of the first titles for SteamVR/HTC Vive, Oculus Touch and Windows Mixed Reality, Space Pirate Trainer has been under continuous development on a mission to refine its gameplay and improve the overall experience. It has been widely used as one of the go-to demos for VR.

No real droids where harmed during the creation of this game.
Use your straps and stay in your VR area to make sure no humans will be harmed.

GAMEPLAY AND SCREENSHOTS :
DOWNLOAD GAME:
♢ Click or choose only one button below to download this game.
♢ View detailed instructions for downloading and installing the game here.
♢ Use 7-Zip to extract RAR, ZIP and ISO files. Install PowerISO to mount ISO files.

Space Pirate Trainer VR Free Download
http://pasted.co/af29b5ae

INSTRUCTIONS FOR THIS GAME
➤ Download the game by clicking on the button link provided above.
➤ Download the game on the host site and turn off your Antivirus or Windows Defender to avoid errors.
➤ Once the download has been finished or completed, locate or go to that file.
➤ To open .iso file, use PowerISO and run the setup as admin then install the game on your PC.
➤ Once the installation process is complete, run the game's exe as admin and you can now play the game.
➤ Congratulations! You can now play this game for free on your PC.
➤ Note: If you like this video game, please buy it and support the developers of this game.

SYSTEM REQUIREMENTS:
(Your PC must at least have the equivalent or higher specs in order to run this game.)


Minimum:
• OS: Win 7 or higher
• Processor: intel i5
• Memory: 8 GB RAM
• Graphics: GTX 970
• DirectX: Version 11
• Storage: 3 GB available space
• Sound Card: Integrated

Recommended:
• OS: Win 7 or higher
• Processor: intel i7
• Memory: 16 GB RAM
• Graphics: GTX 980 or better
• DirectX: Version 11
• Storage: 3 GB available space
Supported Language: English, Italian, Spanish, Polish, Russian, Portuguese-Brazil, Simplified Chinese language are available.
If you have any questions or encountered broken links, please do not hesitate to comment below. :D